LEAFMod v4
The ultimate OEM Battery upgrade solution for your Nissan LEAF
LEAFMod is a battery translator for the Nissan LEAF. Designed with precision and performance in mind, it enables seamless battery upgrades to newer and higher capacity OEM Nissan batteries.
In addition to enabling battery upgrades, LEAFMod helps extend the life of your battery with advanced features like DC fast charge speed control, adjustable slow charge power limits, and customizable State of Charge (SoC) limits.
Plug-N-Play
Hardware Option
Firmware Only
Option for DIY'ers
5 Years
Optional Warranty
Translation & Protection
A compact CAN bridge with battery translation, charge limits, and battery-preserving fast charge management.
Automatically bridges communication between supported battery types and vehicle models, allowing seamless battery upgrades without compatibility issues. Refer to the compatibility chart below to see if your vehicle and battery combination is supported.
Extend your battery’s lifespan by setting custom State of Charge (SoC) limits. Minimize degradation by avoiding unnecessary full charges. Choose to cap charging at 50%, 60%, 70%, 80%, or 90% based on your needs either when slow or fast charging.
Manage fast charging to reduce heat and protect your battery. Choose from five power levels, ranging from 10 kW to 50 kW. If the battery requests more power than your selected limit, the system automatically caps the charging rate to prevent excessive strain.
Optimize slow charging for maximum efficiency and battery longevity. Select a power level between 1 kW and 5 kW to minimize load on limited power sources such as household outlets or solar systems.
This feature mitigates a key weakness in the Leaf’s DC fast charging algorithm. The stock programming favors shorter charge times over long-term battery health by allowing high charge rates that push pack temperatures beyond the optimal range for NMC chemistry. Sustained high C-rate charging and elevated temperatures create parasitic reactions that consume cyclable lithium and produces insulating byproducts and gases. These increase internal resistance and lead to irreversible capacity loss.
LEAFMod uses a dynamic power management algorithm that adjusts DC fast charging power in real-time using live Battery Management System data such as State of Charge (SoC), State of Health (SoH), and battery temperature. Its goal is to keep the pack within a stable thermal range of roughly 20°C to 40°C (68°F-104°F), even if it extends charging time. By continuously regulating current, the system helps prevent excessive heat buildup and the exothermic reactions that accelerate cell degradation.
The result is a marked reduction in thermal and electrochemical stress during DC fast charging, helping to preserve battery energy density well beyond the standard warranty period. This is especially beneficial for owners of already degraded packs, as the algorithm treats them more gently than a brand-new battery.
Supported Cars & Batteries
Check if your vehicle and battery combination is supported.
| Car Model | Compatible Batteries |
|---|
Warning
LEAFMod only works with OEM Nissan battery packs and cannot be used with packs built from cells such as CATL or SVOLT.
Hardware & Firmware
Choose a complete plug-n-play device or firmware-only access for compatible DIY hardware.
Country not listed? Email us at support@leafcanbridge.com to check the possibility of shipping to your location.
Terms: If the product becomes faulty within 5 years of purchase, we will ship a replacement unit free of charge. Un-edited video evidence of the failure is required.
Price:
This purchase does not include battery translation function. Use only with original battery or identical capacity replacement.
Local Dealer Available!
Local stock available from the sole authorized dealer . Please get in touch with them to avoid international shipping.
Leave your name & email to get notified of new stock.
We have discontinued producing the ZE0 compatible LEAFMod hardware. You can use our firmware to build a ZE0 compatible device yourself. See the "Firmware Only" section for more details.
The chosen upgrade path is not supported.
Please allow up to 3 days for order processing. Once shipped, packages are delivered worldwide via DHL, FedEx, or UPS, typically within 7 to 10 days. Any import duties/taxes are the responsibility of the recipient.
HS CODE: 8708.99 - Other parts and accessories of motor vehicles.
Setup & Controls
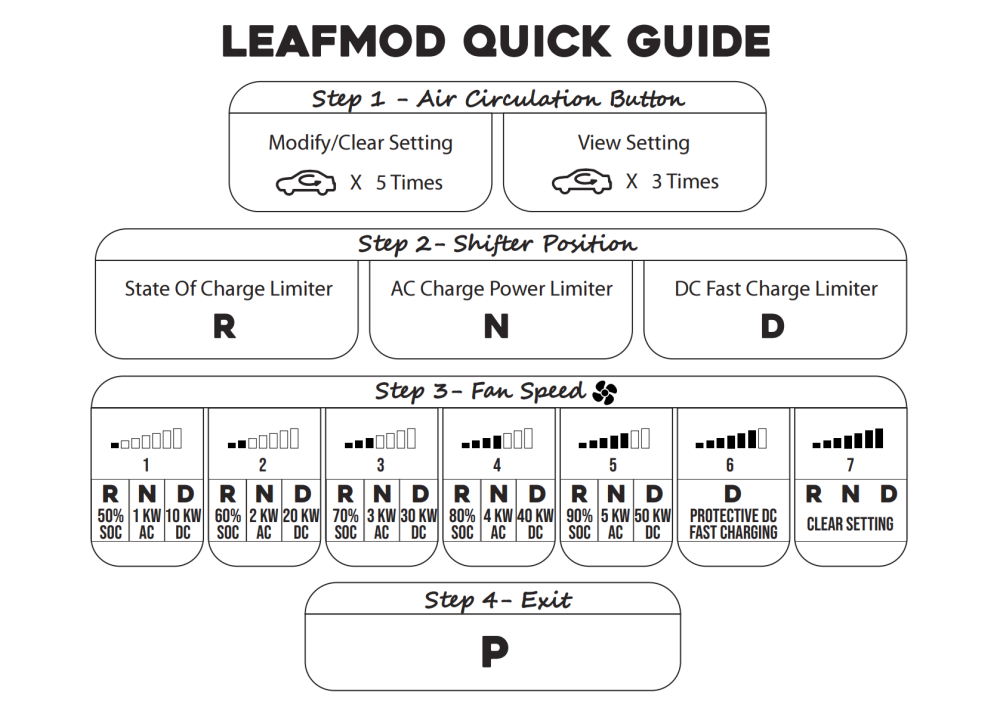
Installation guidance, control sequences, and the printable quick guide for daily reference.
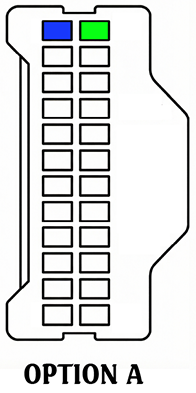
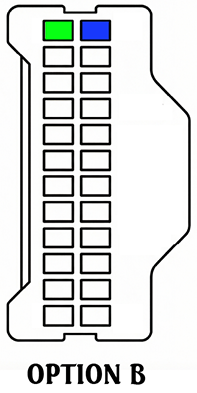
To install the CAN Bridge on a AZE0, first disconnect the vehicle’s 12V battery. Locate the 32-pin CAN connector. It’s in the driver-side footwell of Left-Hand-Drive models, and in the passenger-side footwell of Right-Hand-Drive models. Unplug the car’s connector, insert the supplied harness inline by connecting its female plug to the car’s connector and its male plug back into the car’s socket, allowing the Bridge to intercept CAN signals without cutting wires or splicing. For power, use the supplied 3A tap fuse adapter (red wire) to connect to a constant 12V fuse slot in the cabin fuse box, then ground the black wire with the ring terminal securely to a bare metal point on the vehicle body. Tidy the wiring, and reconnect the 12V battery before powering the car back on.
Important: Be sure to plug the fuse adapter into an always-on 12V socket (one that stays powered even when the car is off). Slots in the center column of the fuse box are typically constant 12V, but it’s best to verify with a multimeter to prevent post-installation issues.
Warning: When replacing the battery with a dissimilar capacity pack, make sure to only install the CAN Bridge after the upgrade procedure has been carried out.
Note: Battery ID registration is not included in the CAN Bridge. You must use a tool such as LeafSpy Pro or Nissan Consult III Plus in order to pair a new battery to the car. Does not apply if it's the car's original battery.
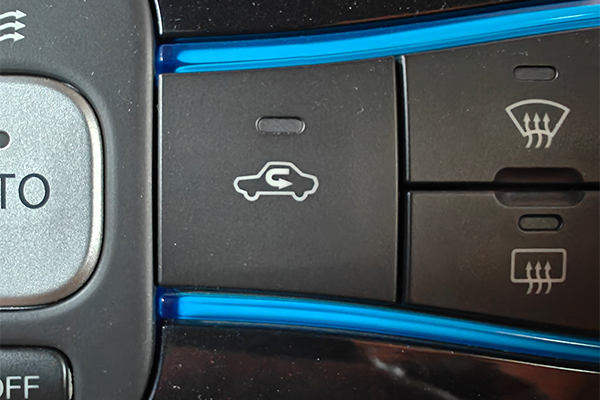
Power the car on and stay in "Park" ➱ Press the "Air Circulation" button repeatedly 5 times (dashboard SoC indicator will show 10% to 50% as you press)
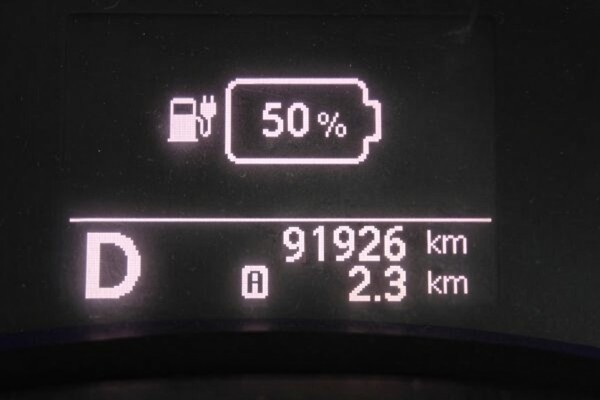
Once the SoC indicator shows 50%, step on the brake and shift in to "Drive". (Make sure to shift within 3 seconds of the SoC indicator showing 50%, or you'll have to repeat the process)
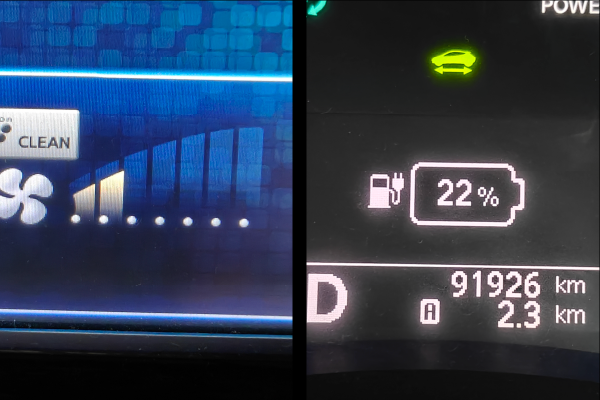
Change the "Fan Speed" from 1 to 5 to select the desired fast charge power limit from 10 kW to 50 kW. The SoC indicator will display your selected setting as one of the following values: 11%, 22%, 33%, 44%, 55%
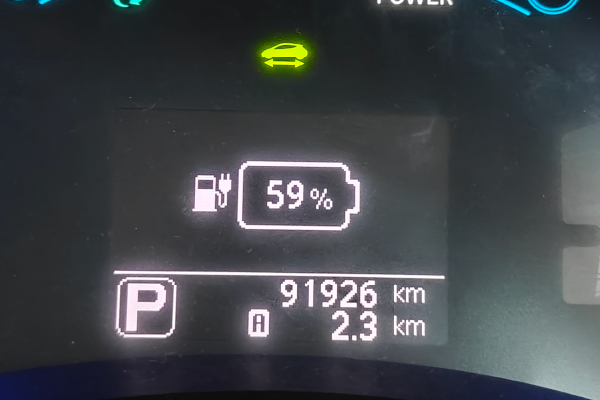
To save your limit and exit the setting update mode, simply shift back in to "Park"
To check the fast charge limit you've previously set, shift to "Park" ➱ Repeatedly press the "Air Circulation" button 3 times ➱ While the dash SoC indicator displays 30%, shift to "Drive" within 3 seconds. The currently set limit will be displayed on the SoC indicator.
To clear the fast charge limit, shift to "Park" ➱ Repeatedly press the "Air Circulation" button 5 times ➱ While the dash SoC indicator displays 50%, shift to "Drive" within 3 seconds ➱ Set the fan speed to 7 ➱ Shift back to "Park" to exit setting update mode.
TIP: ZE0 has no SoC display. You won't see the setting change, but the features work the same.
ZE1: The steps are the same for the ZE1. The HVAC controls are simply arranged differently from the AZE0 controls shown here.
Power the car on and stay in "Park" ➱ Press the "Air Circulation" button repeatedly 5 times (dashboard SoC indicator will show 10% to 50% as you press)
Once the SoC indicator shows 50%, step on the brake and shift in to "Drive". (Make sure to shift within 3 seconds of the SoC indicator showing 50%, or you'll have to repeat the process)
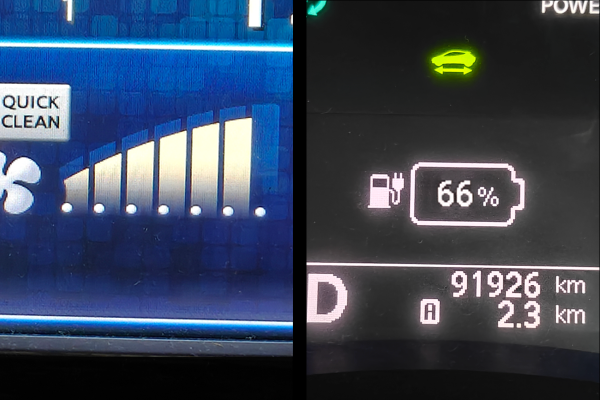
Set the "Fan Speed" to 6 in order to activate the Battery Protective FC algorithm. The instrument cluster SoC indicator will display 66%.
To save your limit and exit the setting update mode, simply shift back in to "Park"
To check the fast charge mode you've previously set, shift to "Park" ➱ Repeatedly press the "Air Circulation" button 3 times ➱ While the dash SoC indicator displays 30%, shift to "Drive" within 3 seconds. The current setting will be displayed on the SoC indicator.
To clear the fast charge setting, shift to "Park" ➱ Repeatedly press the "Air Circulation" button 5 times ➱ While the dash SoC indicator displays 50%, shift to "Drive" within 3 seconds ➱ Set the fan speed to 7 ➱ Shift back to "Park" to exit setting update mode.
TIP: ZE0 has no SoC display. You won't see the setting change, but the features work the same.
ZE1: The steps are the same for the ZE1. The HVAC controls are simply arranged differently from the AZE0 controls shown here.
Power the car on and stay in "Park" ➱ Press the "Air Circulation" button repeatedly 5 times (dashboard SoC indicator will show 10% to 50% as you press)
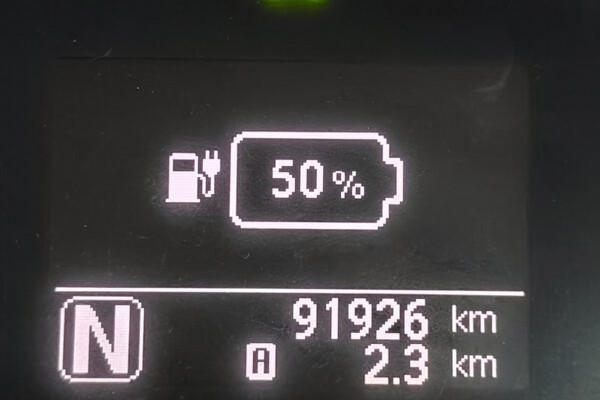
Once the SoC indicator shows 50%, step on the brake and shift in to "Neutral". (Make sure to shift within 3 seconds of the SoC indicator showing 50%, or you'll have to repeat the process)
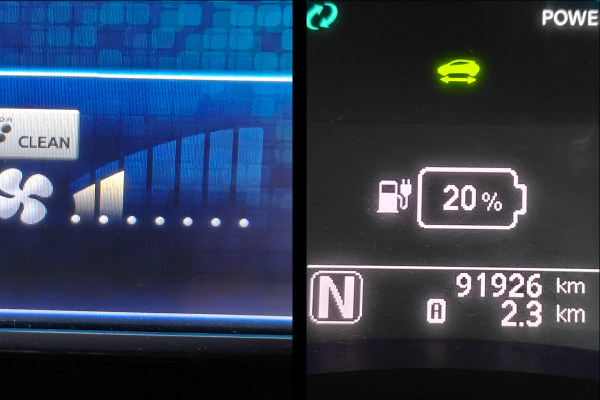
Change the "Fan Speed" from 1 to 5 to select the desired slow charge power from 1 kW to 5 kW. The instrument cluster SoC indicator will display your selected level as one of the following values: 10%, 20%, 30%, 40%, 50%
To save your limit and exit the setting update mode, simply shift back in to "Park"
To check the slow charge power limit you've previously set, shift to "Park" ➱ Repeatedly press the "Air Circulation" button 3 times ➱ While the dash SoC indicator displays 30%, shift to "Neutral" within 3 seconds. The current setting will be displayed on the SoC indicator.
To clear the slow charge power limit, shift to "Park" ➱ Repeatedly press the "Air Circulation" button 5 times ➱ While the dash SoC indicator displays 50%, shift to "Neutral" within 3 seconds ➱ Set the fan speed to 7 ➱ Shift back to "Park" to exit setting update mode.
TIP: ZE0 has no SoC display. You won't see the setting change, but the features work the same.
ZE1: The steps are the same for the ZE1. The HVAC controls are simply arranged differently from the AZE0 controls shown here.
Power the car on and stay in "Park" ➱ Press the "Air Circulation" button repeatedly 5 times (dashboard SoC indicator will show 10% to 50% as you press)
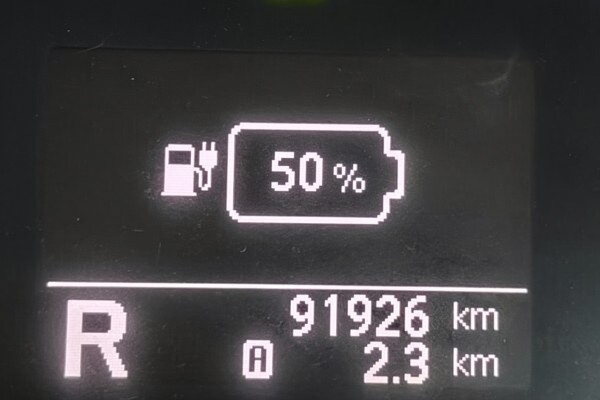
Once the SoC indicator shows 50%, step on the brake and shift in to "Reverse". (Make sure to shift within 3 seconds of the SoC indicator showing 50%, or you'll have to repeat the process)
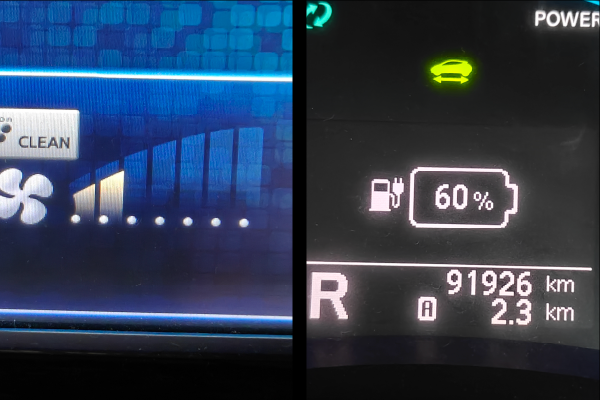
Change the "Fan Speed" from 1 to 5 to select the desired SoC limit from 50% to 90%. The instrument cluster will display your selected setting.
To save your limit and exit the setting update mode, simply shift back in to "Park"
To check the SoC limit you've previously set, shift to "Park" ➱ Repeatedly press the "Air Circulation" button 3 times ➱ While the dash SoC indicator displays 30%, shift to "Reverse" within 3 seconds. The current setting will be displayed on the SoC indicator.
To clear the SoC limit, shift to "Park" ➱ Repeatedly press the "Air Circulation" button 5 times ➱ While the dash SoC indicator displays 50%, shift to "Reverse" within 3 seconds ➱ Set the fan speed to 7 ➱ Shift back to "Park" to exit setting update mode.
TIP: ZE0 has no SoC display. You won't see the setting change, but the features work the same.
ZE1: The steps are the same for the ZE1. The HVAC controls are simply arranged differently from the AZE0 controls shown here.
The following cheat-sheet style quick guide is available in PDF format. It is designed to be printed on A6 size paper. Click the preview image below to download it.